
ICON Training - Hands-on Session
Exercise 6.1: ICON ComIn, Part I#
The ICON Community Interface (ComIn) enables the integration of plugins which is a flexible way to extend the code with your own routines and variables at run-time.
ComIn offers the opportunity to write your plugins in various programming languages, including Fortran, C, and Python. In this training course, we will focus on developing Python plugins.
Step P1: We repeat the previous task “Step F1”, this time using only a few lines of Python code.
Step P2: We learn how to perform data MPI gathering.
Step P3: In the final step, we learn how to use the coupling library YAC in a plugin to interpolate fields from the ICON unstructured grid onto a custom lat-lon grid, and then visualize the interpolated fields.
To complete the following exercises, it is important to have a basic understanding of programming in Python, particularly the correct use of indentation.
Preliminary Step: Building the ICON ComIn Python Adapter#
We will use a prebuilt ICON binary in ICONDIR=/pool/data/ICON/ICON_training/icon. As you are writing a Python plugin in this exercise, there is no need to compile the ICON code at any stage to complete the task.
For educational purposes, it is demonstrated below how to build ICON in a way that allows it to run ComIn plugins. We outline the steps for creating an out-of-source build (recommended).
mkdir -p icon/build
cd icon/build
../config/dkrz/levante.gcc \
  --enable-comin --enable-bundled-python=comin
make -j6
Remarks
The
--enable-bundled-python=cominconfiguration option is used to build the ComIn Python adapter. This adapter is a dynamic library and can be found under/build/externals/comin/build/plugins/python_adapter/libpython_adapter.soThis is the minimal configuration setting for ComIn. For the full,
YACenabled version, please refer back to the explanation provided for F1.
Step P1: Writing a ComIn Python Plugin#
For the necessary information on ComIn, please refer to Section 9.5 of the ICON tutorial. In addition, the ComIn project website contains more detailed documentation. The ICON documentation website contains a section on ComIn featuring the documentation for the latest release version. All these references can be found at the end of this Jupyter notebook.
Your First ComIn Plugin#
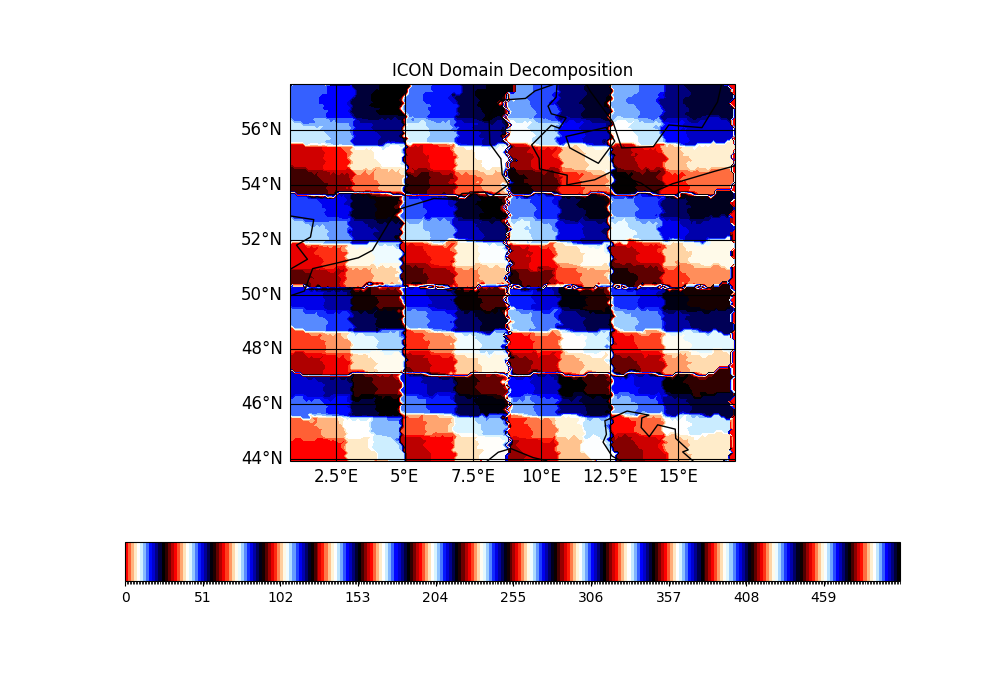
In this step, rather than implementing your programming directly into the ICON source code, you will develop a ComIn plugin to perform a task similar to Step F1 in the ICON programming exercise. In other words, we will visualise ICON’s domain decomposition.

scripts/comin_plugin_P1.py, which you can open by clicking here.
In your plugin, add a 2D diagnostic variable named comin_process_id for domain 1.
As outlined in the ICON tutorial, adding a new variable in your ComIn plugin involves two steps:
- First you need to register a new variable and set the required metadata for the new variable.
You will need the library commandcomin.var_request_addfor this. For a list of available metadata, refer to the Python API. - Secondly, you should access your registered variable like any other ICON variable within the secondary constructor of your plugin.
This happens with the API functioncomin.var_get. Furthermore, you will need to specify the entry point for your callback function. In this exercise, we will use theEP_ATM_WRITE_OUTPUT_BEFOREentry point.
Solution
import comin

jg = 1  # set the domain id

# request to register the variable
var_descriptor = ("comin_process_id", jg)
comin.var_request_add(var_descriptor, lmodexclusive=False)
comin.metadata_set(var_descriptor, zaxis_id = comin.COMIN_ZAXIS_2D)


@comin.EP_SECONDARY_CONSTRUCTOR
def simple_python_constructor():
    global comin_process_id
    comin_process_id = comin.var_get([comin.EP_ATM_WRITE_OUTPUT_BEFORE],
                                     ("comin_process_id", jg),
                                     flag=comin.COMIN_FLAG_WRITE
                                    )
Filling the data array with the process ID#
scripts/comin_plugin_P1.py and attach it to the EP_ATM_WRITE_OUTPUT_BEFORE entry point.
This is done using the comin.register_callback function (a function decorator).
In the callback function, fill the variable comin_process_id with the MPI rank of the processor.
Hints:
In the callback function, import the NumPy package and use
numpy.asarrayto convert a variable handle you accessed into a NumPy array.Refer to the Python API description for ICON ComIn to learn how to obtain the MPI rank of the ICON model in your plugin. A link to the API description is provided in the References section at the end of this Jupyter notebook.
You should use ComIn’s so-called host MPI communicator which is the MPI communicator that comprises all MPI tasks of the ICON simulation which are involved in the ComIn callbacks.If you want to add a log message to your plugin script, you should use
print(”…”, file=sys.stderr)to avoid buffering.
np.asarray is an important point to note: The `comin.var_get` call returns a handle to an ICON variable. However, since ICON contains fields with multiple time levels, the corresponding array pointer changes during the model run. Each time the plugin needs to access the array (pointer), it must be explicitly or implicitly converted to a NumPy array.
Solution
@comin.EP_ATM_WRITE_OUTPUT_BEFORE
def simple_python_callbackfct():
    import numpy as np
    # print("simple_python_callbackfct called!", file=sys.stderr)
    comin_process_id_np = np.asarray(comin_process_id)
    comin_process_id_np[:] = comin.parallel_get_host_mpi_rank()
Running the ICON Model#
Now that you’ve finished writing your plugin, the next step is to run the ICON model. First, execute the following cell in order to set up an example ICON job, similar to the ICON-LAM setting of the previous exercise.
import os
import subprocess

user = os.environ['USER']
home = os.environ['HOME']
scratchdir = f"/scratch/{user[0]}/{user}"
icondir = f"/pool/data/ICON/ICON_training/icon"
expdir = f"{scratchdir}/exercise_comin/P1"
%env ICONDIR={icondir}
%env EXPDIR={expdir}
%env SCRATCHDIR={scratchdir}
Run setup script
!bash $HOME/icon-training-scripts/exercise_comin/prepared/prepare_icon_run.sh
Plugins are enabled via a special namelist comin_nml.
In order to load your plugin dynamically while ICON is running, add a comin_nml namelist to the ICON namelist file. To this end, execute the cell below. We set the plugin_library = libpython_adapter.so with its absolute path such that it can be found by ICON and the operating system.
Note: Alternatively, the search path for libpython_adapter.so could be set through the environment variable LD_LIBRARY_PATH.
# Append comin_nml block
with open(f"{expdir}/NAMELIST_ICON", 'a') as f:
    f.write(f"""&comin_nml
   plugin_list(1)%name           = "comin_plugin"
   plugin_list(1)%plugin_library = "{icondir}/build/externals/comin/build/plugins/python_adapter/libpython_adapter.so"
   plugin_list(1)%options        = "{home}/icon-training-scripts/exercise_comin/scripts/comin_plugin_P1.py"
/
""")
We must customize NAMELIST_ICON to ensure that comin_process_id is included in the model output files for the first domain.
# Append comin_nml block
with open(f"{expdir}/NAMELIST_ICON", 'a') as f:
    f.write(f"""&output_nml
 filetype                    = 4                     ! netcdf
 dom                         = 1
 output_bounds               = 0., 10000000., 3600.  ! start, end, increment
 steps_per_file              = 1
 mode                        = 1
 include_last                = .FALSE.
 steps_per_file_inclfirst    = .FALSE.
 output_filename             = 'NWP_LAM'
 filename_format             = '<output_filename>_DOM<physdom>_<datetime2>'
 output_grid                 = .FALSE.
 remap                       = 1                     ! 1: remap to lat-lon grid
 reg_lon_def                 = 0.8,0.1,17.2
 reg_lat_def                 = 43.9,0.1,57.7
 ml_varlist                  = "comin_process_id"
/
""")
The other parts of the Fortran namelist remain unchanged. In the run script, we set up the environment variables and create symbolic links to the necessary input data required for running the ICON experiment in a directory with plenty of space (scratch).
Now you can run the ICON model.
!cd $EXPDIR && sbatch --account=$SLURM_JOB_ACCOUNT --export=ICONDIR $EXPDIR/icon-lam.sbatch
!squeue -u $USER
|
Exercise:
|
|
Congratulations! You have successfully completed Exercise 6, Part I.
Further Reading and Resources#
-
ICON Tutorial, Ch. 9: https://www.dwd.de/DE/leistungen/nwv_icon_tutorial/nwv_icon_tutorial.html
A new draft version of the ICON Tutorial is available here: https://icon-training-2025-scripts-rendering-cc74a6.gitlab-pages.dkrz.de/index.html. It is currently being finalized and will be published soon. - Documentation on the ICON ComIn project website: https://gitlab.dkrz.de/icon-comin/comin/-/blob/master/doc/icon_comin_doc.md?ref_type=heads
- Python API description for ICON ComIn: https://gitlab.dkrz.de/icon-comin/comin/-/blob/master/doc/comin_python_api.md?ref_type=head
- ICON Documentaton website: Information on ComIn, including the current user guide: https://docs.icon-model.org/tools/comin/comin.html
Author info: Deutscher Wetterdienst (DWD) 2025 :: icon@dwd.de. For a full list of contributors, see CONTRIBUTING in the root directory. License info: see LICENSE file.